
MODUNARU HOW-TO
Remove a background and save a transparent PNG
Remove a photo’s background while keeping the subject, compare the edges against the original, then save the cutout as a PNG with transparency. Follow the steps below and inspect actual before-and-after files.
Which photo and format should I use?
Start with a photo whose subject is clearly separated from its background. One distinct subject, different background colors and sharp edges make the result easier to inspect. Overlapping subjects or similar colors can cause the AI to choose the wrong area.
- The photo editor accepts one still JPG, PNG or WebP, up to 25 MB and 40 megapixels. HEIC, GIF and animated images are not supported.
- Background removal supports originals up to 16 megapixels. Entering smaller output dimensions does not change this source limit. Save a smaller copy first, then select that copy.
- First use downloads about 19 MB of AI processing files from this site. This is not a photo upload; processing happens in the browser on your device. First use needs an internet connection and available memory.
- Choose PNG to preserve transparency here. Modunaru’s JPG and WebP export paths fill transparent areas with white. This describes this tool’s export behavior, not a limitation of the WebP format.
Steps to remove the background and save a transparent PNG
Choose a photo and remove its background
Use Choose a photo, open Remove background in Edit & save, then choose Remove background. Check the progress message while processing files are prepared or downloaded. Use Cancel processing if you want to stop.Compare the source with the cutout
Switch between Original and Fitted preview. Zoom in on hair, fur, fingers, thin objects, translucent areas and openings within the subject. If important parts are removed or background remains, use Restore background or Undo. There is currently no brush for manually erasing or restoring edges.Check output dimensions and PNG format
After removal, PNG and a 25,000 KB maximum are selected automatically. Open Size & format to check the dimensions and limit you need. To keep the whole source, choose Photo ratio for Output ratio with no free crop applied. With a free crop applied, the ratio follows that selection; undo the crop first if needed. To fit the whole subject into a different canvas ratio, use Fit whole photo. Empty PNG padding stays transparent.Convert, inspect and save the actual result
Choose Make my photo fit, then check PNG format, actual file size and dimensions under Check your result. The checkerboard only indicates transparency and is not part of the PNG file. Download the result and inspect its edges over another background too. After changing edits or settings, convert again and save the new file.
MEASURED EXAMPLES
Actual before-and-after files
The sources below are public CC0 example photos. Each result was background-removed and saved as PNG with the Modunaru photo tool. Compare it with the source to check the subject and its edges. These examples do not guarantee the same quality for every photo.
Measured on: · Backgrounds were removed with the actual Modunaru tool in the in-app browser on a PC; downloaded PNGs were checked for transparency and file size.
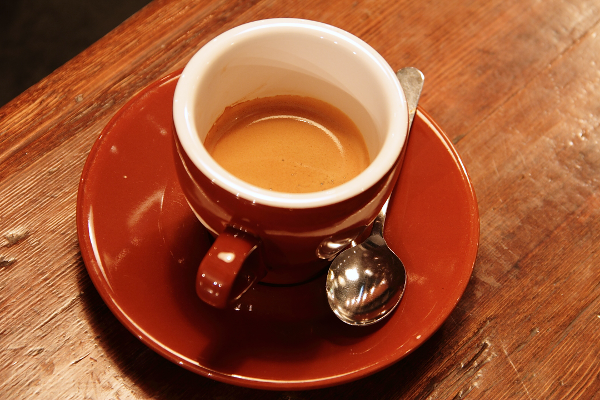
Coffee cup and saucer
Source photo
Saved file after removal

The checkerboard is a display aid for transparent areas.
- Output settings
- 600 × 400 px · 25,000 KB · PNG
- How the photo fits
- Fit whole photo
The cup, saucer and spoon remain together. Small background fragments and reddish fringes are visible outside the upper-left edge. A transparent PNG does not mean a perfect cutout; compare with the source to check which objects remain.
Source credit: Rachel Michetti · View source and credit · CC0. The PNG result is an edited version of that source.

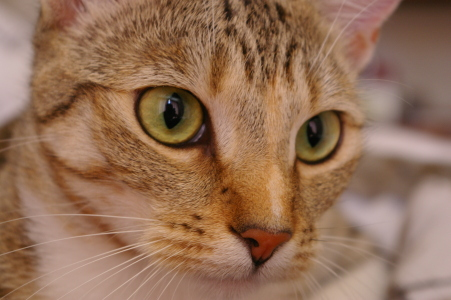
Cat fur and whisker edges
Source photo
Saved file after removal
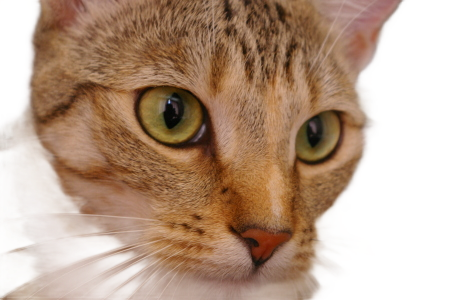
The checkerboard is a display aid for transparent areas.
- Output settings
- 451 × 300 px · 25,000 KB · PNG
- How the photo fits
- Fill & crop
The cat’s face remains, but colored fringes and an irregular boundary are visible around fur and whiskers at the lower right. Fine whiskers may be interrupted and background fragments can remain. Zoom in and inspect over another background. The current tool has no manual edge erase/restore brush.
Source credit: Stefan van der Walt · View source and credit · CC0. The PNG result is an edited version of that source.

File size and edge detail vary with the source, dimensions, edits and browser. Another photo of the same subject can produce a different result. Place the downloaded PNG on a different background to inspect its edges.
If removal looks wrong or saving fails
- If hair, fur or object edges are missing, compare with Original and try a sharper source or a more distinct background. Zoom helps inspection; it does not restore missing details. Accurate removal is not guaranteed for every photo.
- If removal does not finish, check whether first-use downloads completed and the connection is available. The 16-megapixel source limit and device memory also matter. Cancel processing and try a smaller copy. Cancellation or failure keeps the current photo and existing edits.
- If the PNG exceeds the budget, keep PNG when transparency is needed and increase the limit as permitted, up to 25,000 KB. If smaller dimensions are allowed, reduce width and height yourself and convert again. The tool does not silently shrink your requested pixels to claim success.
- If the save button does not respond, try Save or share photo, or Save or share file under Other ways to save · View photo. Cancelling the share screen does not save the file. Check that the new PNG actually opens in the chosen app or your Files app.
Frequently asked questions
Does converting to PNG remove the background?
No. PNG can store transparent areas, but converting an opaque source to PNG does not remove its background. Run Remove background, inspect the cutout, then convert to PNG.
Why does my saved PNG look white or black in the gallery?
A photo app may display white or black behind transparency. Instead of judging by the gallery color alone, select the saved PNG again or place it over a different background. Also check that the file was not changed to JPG.
Can I make a transparent PNG smaller than 100 KB?
Sometimes, but PNG does not use lossy quality compression. A particular combination of fixed dimensions and a small budget may not fit. If the limit is not met, saving is blocked and the tool explains why. Keep PNG if transparency is required, then increase the limit or reduce dimensions only as permitted.
How do I save on my phone or in the NAVER app?
After converting, use Save or share photo when shown and choose an app or location. If Download photo does not respond, open Other ways to save · View photo and try Save or share file. If sharing is unavailable, you can also try pressing and holding the exported photo to save it. Confirm that it was saved as PNG in the selected app or your Files app.
Does this change my original file or other edits?
A new file is created without overwriting the original. Restore background brings back the original background while keeping other edits. Undo steps back through editing history. Save the result before closing the page or changing the photo because the working session does not persist.
Can I submit a background-removed image as an ID or passport photo?
Background removal does not validate or guarantee acceptance of a submission photo. Some services may not allow background editing. Check the receiving service’s current rules for face proportions, background, photo age and permitted edits first.